HeroMachine Mini Layout

If you've ever wished you could influence the design of an actual Internet application, now's your chance! I am designing the next generation of HeroMachine Mini-applets and I want to hear from you about what you do and don't want them to be like. The goal is to create one basic frame that can be used for any of these smaller applets by changing just a few pieces of data (and of course drawing all new items).

Here's the latest version of the wireframe (a basic layout without any design elements applied) I am considering for future "HeroMachine Minis" like a Face Maker, Alien Creature Creator, or what have you:

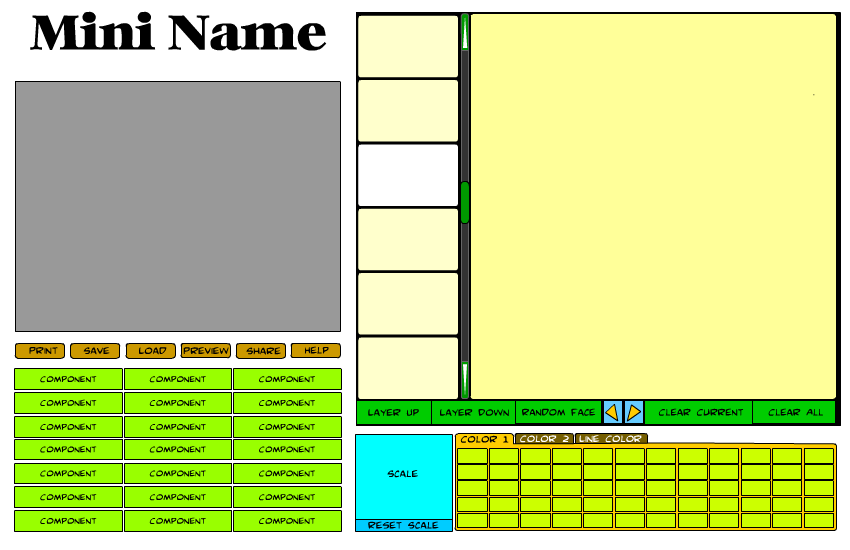
The gray area would be for a 325x250 ad. Below that are general function buttons that affect the overall applet. The only "new" one is the "preview" button, which will remove everything except the current creation, shown full-screen. I might even include some zooming type of feature on that screen. Below that in light green are the various item category buttons (for instance "Headgear", "Undershirt", and so on).

The right side of the applet is for actually creating your image. The row of six small rectangles is for item previews, like you have in HeroMachine 2.5, so you can see a set of items before having to pick one. The currently selected item would be highlighted in white. You can scroll up or down an entire set of six items by clicking either below or above the green scroll button, or more than one set by dragging the scroll button itself. The green arrows at the top and bottom of the scroll bar allow you to scroll the preview boxes up or down one box at a time. Clicking on a preview box will select that item and put it on the dark yellow canvas area, applying the currently selected colors to it.

Below the preview boxes and the canvas area is a row of buttons that let you affect the current item or the entire image. Items can be moved up or down in layers, like in the current HeroMachine 2.5 application. You can clear the current item, clear all items, or clear just the currently selected item. The blue and yellow arrow buttons let you select the next or previous item in the set, acting like the left and right arrows that were previously integrated into the component selection boxes.

Below that row of buttons is the scaling control. This will let you stretch the currently selected item sidways or up and down. You can move the current item around on the canvas by clicking and dragging it.

Finally, to the right of the scaling control is the color selection area. The number of color boxes here is flexible. You can potentially set two different color areas as well as the line color. Selecting a color area tab will set that as the active region.

That pretty much covers it. I'd be delighted to hear any suggestions or concerns you might have about this proposed interface -- features to include that aren't there, features currently there you think would be useless, overall layout, anything goes.

Monday Mashup 9: A Step in Time

Today I'll post another attempt at taking one (and only one) panel from ten randomly selected comic books and making a coherent story out of them. In a bit of a departure, though, this week I'm going for something rather more serious than silly; we'll have to see if it works. With that, buckle your time machine's seatbelts, kids, as we're headed off to the future!

Continue reading

Random Panel: Bad excuses for why you're late for work

I was preparing to deal with the dwarf

Random Panel: High school nerd date flashback

You could use a BATH, too! You smell AWFUL!

Wolverine claws

The Bat iPod was a joke I came up with, but there are people out there who really can and do make very cool replicas of comic book items. Take this guy, for instance, who put together a kick-butt set of Wolverine claws:

Real Life Wolverine claws

Maybe if I send him my Bat iPod brass knuckles he could whip me up a real-life set? I can dream.

Or maybe I should send them to the guy who made the actual set of claws used in the X-Men movie. This article shows how Canadian special effects artist James Gawley crafted the iconic weapons, and the difficulties of translating comic book physics into everyday life. Well worth a weekend read.

Random Panel: Captain Chekov

In the USSR he’s CAPTAIN Chekov …

The Sounds of Bondage

James Bond scores with so many women, even his sound effects are filled with sexual innuendo. I think it's pretty clear that "Swut" is really "Slut":

Swut

"Skankt" is just plain ol' "Skank":

Skankt

And while James probably doesn't speak Yiddish, I think it's clear what this sound effect is all about:

Stup

James Bond, License to Love.

I really must learn to control my urges, mustn’t I

Yes, James, you really lust. Must!

(All images and characters from James Bond 007: Serpent’s Tooth, No. 1, ©1992, Acme Comics Ltd., Dark Horse Comics, Inc., and Glidrose Publications, Ltd.)

HeroMachine 2.5 New Components!

I am pleased to announce that the full set of Expansion items comprising HeroMachine 2.5 is now complete and available on UGO.com, absolutely free! This release includes all of the bug fixes reported previously as well as 28 new component genres available for your use. I have copied over the most popular components into other slots so you can now have two items from the Coat component, or two from Undershirts, two Companions, etc. Here is the complete list of new component options:

Continue reading

Random Panel: Next on Dr. Phil!

I turned my own brother into a blood-sucking vampire!

Face Maker

With the HeroMachine 2.5 Expansion nearing completion, I am starting to think about the next big project I should work on. After a bit of back and forth, the one that has me most excited is the idea of a Face Maker, a HeroMachine-powered applet that would focus on the face and head. One site that does something similar is "Ultimate Flash Face", to give you an idea of what I am talking about here. I've got a rough draft wire frame model and some other thoughts after the jump.

Continue reading