Author Archives: AFDStudios

New Expansion Items are LIVE!

I am happy to announce that the new expansion items from Mark Shute are now LIVE in the first and second male, and first female, body templates! This update includes most of what you see in Mark’s preview, for a rough new item count of 300 or so. All are located in the Expansion1 set of each component, usually at the end. We’ve got dozens of new guns, new shields, beard styles, gloves, you name it, so check it out today!

And as always, thanks to the nice people at UGO, these new Expansion items are yours absolutely free.

(01-21-08, edited to add)

The expansion items will be available for free download in the Desktop Edition once all of the items are available for all six bodies. Until then, there’s no point in putting up a new 45+MB package that people are going to have to download over and over with each tweak. At this point the expansion is still in “beta”; once it’s completely done, it’ll be put into a downloadable format.

Bad Costumes: Demolition Team

I love Dave Gibbons’ art and Len Wein’s writing, and I actually think the Demolition Team’s costumes are perfect for what they are, but this particular illustration made me stop and wonder:

Demolition Team Beer Hat

Has any other villain in history worn a beer hat into combat? Granted, a cold beverage might be just the ticket when things heat up, and I bet her backpack functions as a refrigerator, but still, don’t drink and rivet, you know what I mean?

(Demolition Team image © 1984, DC Comics, Green Lantern #174)

Custom Illustrations: Talena

A friend of mine, “EvilDM” Jeff Mejia, created a role-playing game called “Legends of Steel” and asked me to do some character sketches for him. One of the characters was a pirate thief named Talena, and to show me what he wanted he sent me this HeroMachine image:

Talena, HeroMachine version

I took that and redrew it to look like this:

Talena-Color

This is the kind of thing I’d like to do in the upcoming “Custom Character Portrait” contest, or whatever we end up calling it (suggestions more than welcome!). I think the original HM version is nice, and could even be used for a camera-ready, print-quality production if he wanted, but there’s just nothing like an actual illustration done by a pro.

Expansion Load Character String

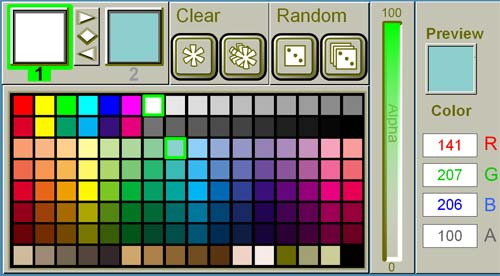
I thought it might be handy to have a ready-to-go character string you can just paste into the “Load” box to load up all of the Expansion genres at once instead of having to hunt and peck for them.

2.5*m1*ExpansionSet*Hair:Expansion1,fraBlank,FFFFFF,FFFFFF,100,100,23,
Eyebrows:Expansion1,fraBlank,FFFFFF,FFFFFF,100,100,21,Eyes:Expansion1,
fraBlank,FFFFFF,FFFFFF,100,100,20,Nose:Expansion1,fraBlank,FFFFFF,
FFFFFF,100,100,27,Mouth:Expansion1,fraBlank,FFFFFF,FFFFFF,100,
100,18,Beard:Expansion1,fraBlank,FFFFFF,FFFFFF,100,100,26,
Ears:Expansion1,fraBlank,FFFFFF,FFFFFF,100,100,19,Skin:Expansion1,
fraBlank,FFFFFF,FFFFFF,100,100,6,Mask:Expansion1,fraBlank,FFFFFF,
FFFFFF,100,100,22,Headgear:Expansion1,fraBlank,FFFFFF,FFFFFF,100,
100,29,Undershirt:Expansion1,fraBlank,FFFFFF,FFFFFF,100,100,7,
Overshirt:Expansion1,fraBlank,FFFFFF,FFFFFF,100,100,8,Coat:Expansion1,
fraBlank,FFFFFF,FFFFFF,100,100,25,RightGlove:Expansion1,fraBlank,FFFFFF,
FFFFFF,100,100,17,LeftGlove:Expansion1,fraBlank,FFFFFF,FFFFFF,100,100,
16,Insignia:Expansion1,fraBlank,FFFFFF,FFFFFF,100,100,9,
Neckwear:Expansion1,fraBlank,FFFFFF,FFFFFF,100,100,24,Belt:Expansion1,
fraBlank,FFFFFF,FFFFFF,100,100,15,Leggings:Expansion1,fraBlank,FFFFFF,
FFFFFF,100,100,10,Overleggings:Expansion1,fraBlank,FFFFFF,FFFFFF,100,
100,11,Pants:Expansion1,fraBlank,FFFFFF,FFFFFF,100,100,14,
RightFoot:Expansion1,fraBlank,FFFFFF,FFFFFF,100,100,13,
LeftFoot:Expansion1,fraBlank,FFFFFF,FFFFFF,100,100,12,Back:Expansion1,
fraBlank,FFFFFF,FFFFFF,100,100,3,Wings:Expansion1,fraBlank,FFFFFF,
FFFFFF,100,100,4,Tail:Expansion1,fraBlank,FFFFFF,FFFFFF,100,100,5,
Aura:Expansion1,fraBlank,FFFFFF,FFFFFF,100,100,2,Companion:Expansion1,
fraBlank,FFFFFF,FFFFFF,100,100,31,Background:Expansion1,fraBlank,
FFFFFF,FFFFFF,100,100,1,RightHand:,fraBlank,FFFFFF,FFFFFF,100,
100,30,LeftHand:Expansion1,fraBlank,FFFFFF,FFFFFF,100,100,28,#

To use it:

  1. Copy the text string above (starting with 2 and ending with #);
  2. Open HeroMachine 2 Online Edition;
  3. Click on the “Load” button (the one that looks like a folder);
  4. Right-Click in the big white window, and choose “Paste” from the flyout menu;
  5. Click “Load” at the bottom of that window.

The first male body should load, then all of the Expansion genres, and you’ll be good to go. If you want to load the first (athletic) female body with all the expansion items, change the 2.1*m1* at the beginning of the string to 2.1*f1*. For the second (dwarf) male figure with all expansion items, change 2.1*m1* to 2.1*m2*.

Bad Costumes: Blackout's Mask

Bad super-hero costuming isn’t limited just to complete outfits. It’s entirely possible to have a pretty decent uniform that contains one or more ridiculous components, as I think this panel featuring Marvel bad guy “Blackout” can attest:

bad-blackout.jpg

Apparently Blackout goes to the same haberdasher as “Electro”. A steep discount in off-the-rack super-villain accouterments is the only explanation I can come up with for this mask/headdress; I imagine the conversation went like this:

Electro’s MaskElectro: Dammit, I told you I only wanted FIVE lightning bolts on this mask, not SIX!
Haberdasher: Right away, sir, my apologies. snip snip There, all better!
(Several weeks later, Blackout walks into the shop.)
Blackout: Haberdasher, I need a mask! Something with lightning!
Haberdasher: Certainly, I’d be happy to make one up for you, only $1,000.
Blackout: Crap, I only have fifty on me.
Haberdasher, thinking: Hm, I can give you a one-bolt mask out of a remainder for that.
Blackout: Sold!

I bet that thing gets caught on the top of the car door frame every single time. On the plus side, if his electrical powers should ever fail him, he can always lower his head and charge like Rhino, so there’s that.

(All images copyright Marvel Comics)

Tip: Color Selection

If you are using HeroMachine 2 Desktop Edition, holding down the SHIFT key and clicking on a color paints the opposite color area of the item. In other words, if “Color 1” is active in the color box, holding down SHIFT and clicking on a color will make that the active “Color 2”, and vice versa. This does not currently work in the online version (I’m not sure why) but is functional in the Desktop Edition.

HM2 Color Selection

Even though Color 1 is highlighted (and set to white), by holding down the SHIFT key I can set Color 2 to light blue. This saves having to mouse up to the top and toggling the color area.

HeroMachine 3 Items

One of the members of the HeroMachine discussion group wrote the following suggestions for HeroMachine 3:

I have three suggestion for the HM 3
1- create a forhead component. Cool for jewel and other piercing but also for rhino or unicorn horns and for classi mask insignias.
2 – Separate belt in two components : the belt body and the buckle. It permit to create combos. You can introduce in hM3 stuff like metallic letters buckles or other symbol bucles and combinate that with all kind of belt.
3 – Patterning : Not just propose only color but also patterns. Those patterns must be color customisable, of course. It particulary interesting for components like undershirts, leggings and masks. But we can imagine different kinds of patterns and textures for each components. But i suppose it’s less manageable.

These are excellent suggestions. The patterning is already in the plan (such as it is), but I hadn’t thought about separating out buckles.

In my head, the basic idea behind HM3 will be that each spot on the body will have multiple sets of items you can load onto it. So for instance, among the slots available to place on the Torso would be four for shirts (Shirt Slot 1, Slot 2, Slot 3, and Slot 4). I’d have a bunch of separate files containing item sets that would fit any of those four slots, probably grouped into themes, like “Undershirts”, “Overshirts”, “Bandoliers”, “Capes”, etc. so it’s easy to find the items you want. But you could choose to load all four slots up with the Undershirt items if you wanted.

One of the key differentiators between HM1 and HM2 was that in HM1, if you wanted a particular body, you were stuck with whatever components and items were made for that body. So if you wanted a big brickish looking guy, you couldn’t get martial artist weapons, or if you wanted a melee warrior you couldn’t get firearms. HM2 did away with that limitation, so all items and all components were available on any body style. But you still are stuck with, for instance, only one Coat slot. If there are two Coats you want to layer on a character, you can’t. My goal with HM3 is to do away with that limitation, so that you can basically load any set of items you want into any component slot you want.

That raises some complications when it comes to masking — for instance, fitting a gun into a hand without the lines from the gun overlapping the lines of the hand. But that’s the general idea.

Beowulf's Uncanny Valley

I got to see “Beowulf” in glorious 3D IMAX last weekend, and while I really liked it, I think ultimately it gets a bit lost in the Uncanny Valley.

Continue reading

Bad Costumes: Truk

It was the best of times, it was the worst of times. Specifically, it was the worst of times for super-hero costume design, aka “the 1980’s”. As proof, I give you “Truk”, a villain from the pages of DC’s “The Green Lantern Corps” circa 1986:

Truk

I find myself rendered almost speechless by how incredibly lame this character is. If bad were a scale that went to ten, “Truk” would be an eleven. At first I assumed this incident resulted from some sort of Marvel-led takeover of the DC offices in an effort to drive them out of business. Or perhaps it was a bad April Fool’s joke.

But no. This is an actual, bona-fide, yes-they-really-meant-to-do-it super-villain. And thus I am legally required to unleash the mockery.
Continue reading

Custom Illustrations

Over the years I’ve had a couple of freelance clients send me images of a character from HeroMachine that they wanted to have in a custom illustration. Don’t get me wrong, HeroMachine is great for making “darn good” portraits, but there’s just nothing like a true, unique, professionally rendered image.

I thought it might be interesting to show you how the program can be used to give an artist a really good idea of what you’re looking for, though, so here’s one example of a character designed in HeroMachine, then rendered by hand. I give you Kubota, pint-sized (but deadly serious) soldier of fortune in the Star Frontiers game world (click on either image for a larger version):

Kubota - HeroMachine version Kubota - Hand Drawn

I’ll be posting a few more of these over the next little while, the HeroMachine version first and then the custom illustration next. If anyone’s interested, I’ve also been thinking about having a contest. People would send me their HeroMachine creations, I’d pick, say, the five best, and then open it up to a vote. The winner would get a custom character portrait based on that visual.

If that sounds interesting, please leave a comment and let me know!