
- This topic has 31 replies, 12 voices.
-
AuthorPosts
-
August 26, 2012 at 2:36 pm #9975

Kaylin88100ParticipantOK, I’ve updated the female tutorial with text instructions like I did for the other one.
August 28, 2012 at 5:29 am #10081
Kaylin88100ParticipantText saving tutorial:
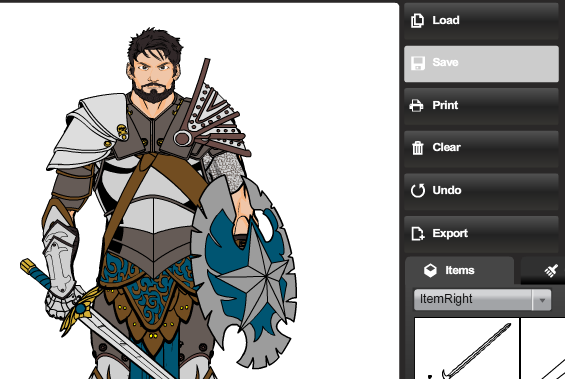
First, load up the character you want to save as text. I’ll use this one, from the Templates, as an example.
http://i1111.photobucket.com/albums/h464/Kaylin88100/HeroMachine%20Tutorials/1.png
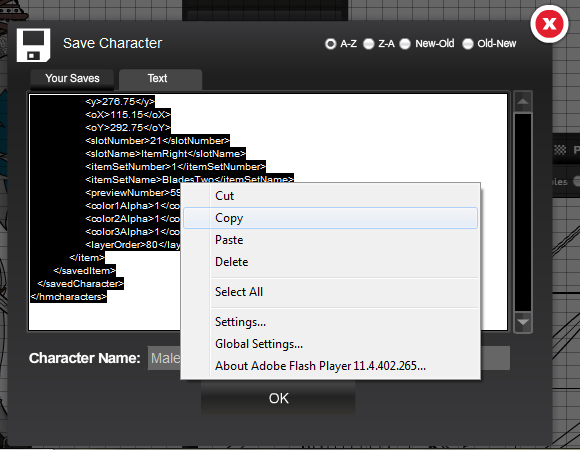
Click the “Save” button, like you would to save it normally. But here’s where it starts getting different. At the top of the Save box there are two tabs. You’re on the “Your Saves” tab, and it’s showing all the characters you have saved on the program. What you need to do now is click the other tab, which says “Text”.
http://i1111.photobucket.com/albums/h464/Kaylin88100/HeroMachine%20Tutorials/2.png
Something that looks like this ^ should come up. Select all the text – it’s very important that you don’t miss any. It helps if you know a keyboard shortcut for this (it’s Ctrl+A on a PC).
http://i1111.photobucket.com/albums/h464/Kaylin88100/HeroMachine%20Tutorials/3.png
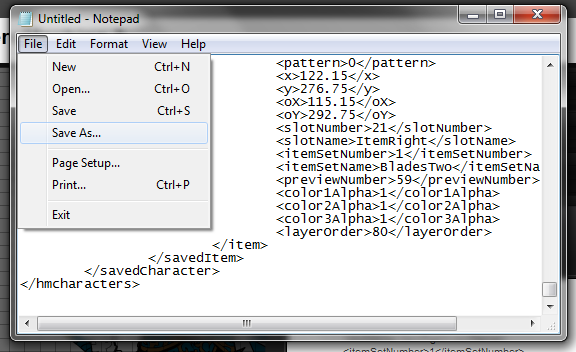
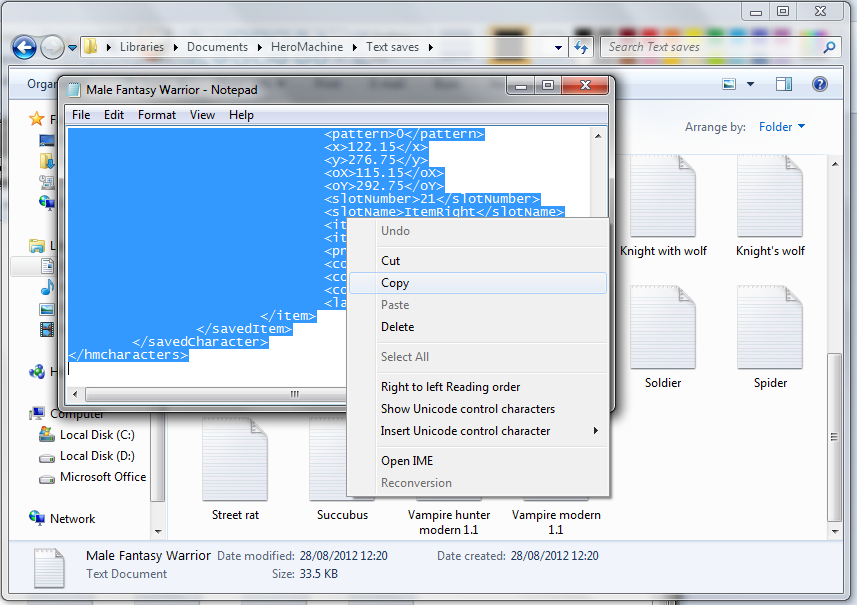
Copy the text, and paste it into a text editing program, like Notepad or Word. I prefer Notepad.
http://i1111.photobucket.com/albums/h464/Kaylin88100/HeroMachine%20Tutorials/4.png
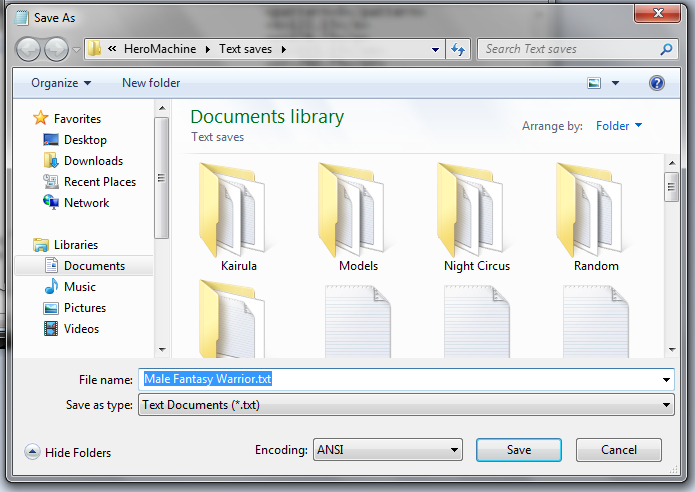
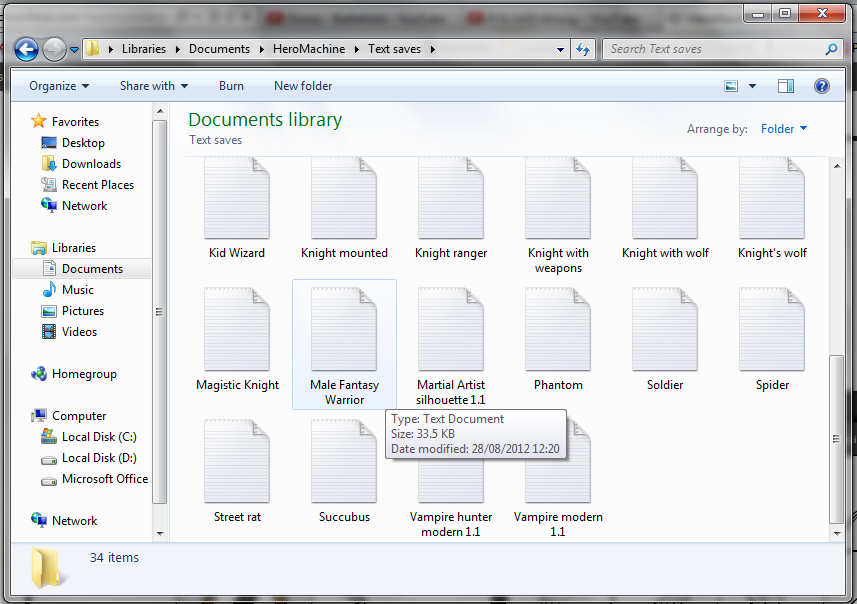
Save the file to your computer, in a sensible place. If you have a folder for all your HeroMachine characters’ images, I suggest having a folder in that one called “Text Saves”.
http://i1111.photobucket.com/albums/h464/Kaylin88100/HeroMachine%20Tutorials/5.png
Finally, give it a name so you’ll be able to tell which one it is when you want it again. Done!August 28, 2012 at 5:39 am #10083
Kaylin88100ParticipantHow to load from text:
There’s not much point having all your characters saved as text files if you just leave them there and don’t ever use them. So here’s how to get them back onto the program. First, open the folder where you put the text file. If you put it in a sensible place, clearly labelled as “Heromachine text saves” or something similar, this bit should be easy.
http://i1111.photobucket.com/albums/h464/Kaylin88100/HeroMachine%20Tutorials/load1.png
Find the one you want, and open it. Again, easy as long as you named it properly. Select all the text again – if you miss any, it won’t work.
http://i1111.photobucket.com/albums/h464/Kaylin88100/HeroMachine%20Tutorials/load2.png
Copy it and open up HeroMachine. Click the “Load” button just above the “Save” one. You are (hopefully) now looking at a list of all the characters you have saved on the program.
http://i1111.photobucket.com/albums/h464/Kaylin88100/HeroMachine%20Tutorials/load3.png
There are three tabs this time. You are on the tab “Your Saves”. Click on the “Text” tab. In case you didn’t know, the “Templates” tab contains a few example characters made by various HM’ers and sent to Jeff, who added them to the program. One of them is the Male Fantasy Warrior I’m using for this tutorial, because I can’t be bothered to dig out one of my own!
http://i1111.photobucket.com/albums/h464/Kaylin88100/HeroMachine%20Tutorials/load4.png
Now paste the text into the blank box. Click “OK” and your character should load.
http://i1111.photobucket.com/albums/h464/Kaylin88100/HeroMachine%20Tutorials/load5.png
If it doesn’t, that probably means at some point you failed to copy the text properly. Go back and try again. If your character does load, however, well done! You have successfully followed my instructions. A final hint: You can also use this method to transfer saved characters from one computer to another via e-mail, etc. Happy HM-ing!August 29, 2012 at 3:54 am #10126
djubyParticipantOk. So I have a stripped down pose (jpg), and the text version (which I checked and it works) saved as a Word doc. It seems that while I can post the picture, and it appears as though I am posting the doc file, when the upload is complete the doc file is missing. I tried cutting and pasting, but then I seem to have a very long post with a ton of text that when cut and pasted into the alpha does not work. I know it’s me.
August 29, 2012 at 4:43 am #10131
Kaylin88100ParticipantI don’t know what to do about that…I can’t do it either! The reason it doesn’t work as a simple copy-and-paste is that the text contains tags, which are then removed by the forum, rendering the text useless. So that bit isn’t you. I suggest posting the text on another website and providing a link, as a temporary work-around until someone (not me!) figures it out.
August 29, 2012 at 8:08 am #10146
KaldathKeymasterJeff Made a post about this Last week in the How to post your Character thread, here’s the link.
https://www.heromachine.com/forum/the-heromachine-art-gallery/how-to-post-your-character/#p9634
I haven’t tried it myself yet, so I hope this helps get your text files posted
August 29, 2012 at 8:11 am #10147
Kaylin88100ParticipantThanks Kaldath!
 October 10, 2012 at 10:45 am #12040
Kaylin88100ParticipantOK, here’s a tutorial on how to create group shots on HM3.
First, you need to create all the members of your group as separate HeroMachine saves. At this stage, just leave them all in the default position so you can see them. We’ll move them later. As an example, I’m going to use 3 of the Template characters in a group shot: Female Fantasy Warrior, Male Fantasy Warrior and Princess 2.

I’ve decided I want Female Fantasy Warrior (FFW) in the center of the trio, so I just save her and leave her as she is. Male Fantasy Warrior (MFW) needs to be on the left, so I need to move every item in that character over to the left. Most people’s instinct would probably be to move “All Items”, but that doesn’t work. What you need to do instead is to move them in groups. Select a Body item, like the chestplate, and then select the “Body” option to group all the Body items. Now you can move them using the buttons and they should all move together.

Do the same for Head, FootRight, HandRight and any other categories, like Companions. Careful, though: some items overlap! For example, ItemRight is in Body and HandRight, so if you have any ItemRight objects, like MFW’s shield, you’ll need to select ItemRight and move it the same amount the other way, before moving HandRight. Neckwear is in Body and Head.

I’ve moved MFW over so you can only just see him at the side of the screen. Now I can save him like that and do the same with Princess 2.

I’ve moved Princess 2 the same amount the opposite way, using the same technique. I think a good distance is about 240 pixels, which you can get by selecting the 20 option and moving 12 times.Now I have my characters saved in the correct position, I need to put them together. I’ve got Princess 2 loaded at the moment, because I just finished moving her. Now I’ll add MFW. On the “Load” screen, look at the bottom of the box, where it asks you if you want to keep the currently loaded items. This means “do you want to switch from the character you’ve got right now, to the one you’re loading, or do you want to have them both loaded?” Normally you probably want to switch, but for a group shot we need them together, so select the box and make sure it has a cross in it.

Now you should have both the characters on the screen. Load up your third character the same way, making sure the box is checked.

I chose to load up my middle character last, because she needs to be at the front. When you load two characters together, the new one loads on top of the current one. Make sure you start from the back and work forwards, or you’ll have a lot of work to do fixing it.At the moment, I can only really see one of my characters, and I need to check that the other two are alright. At the bottom of the screen, underneath their feet, there is a toolbar that allows you to change the display mode. Selecting the widescreen option removes all the toolbars and centers your characters, so you can see all of them.

This is what it looks like. Now I can see all 3 of the characters side-by-side. I must have gone slightly wrong somewhere, though, because the outer two are missing a hand each! Oh well. You’ll probably do better. To leave widescreen and go back to the normal view, just click on anything.

Don’t forget to create a record of your awesome tutorial-following skills! You can either take a screenshot in widescreen view, or select one of the Widescreen options when you Export the image. Also, remember to save!
October 12, 2012 at 2:18 pm #12135
WeilynMemberAwesome! I’ve been wondering about that. Working with two characters on the screen at the same time is a pain
Thank you very much!
October 13, 2012 at 8:04 pm #12195
VampyristParticipantWow! Nice tutorial. I would have never thought of doing it like that.
October 13, 2012 at 9:41 pm #12204
The Atomic PunkParticipantWhen I create groupshots, I typically create one character at a time then save the text. I open the main character / centerpiece first. Before I load the second character, I manually go into the text and make the adjustments to the X coordinates. For instance, adding or subtracting 240 pixels depending on whether I want the other character to stand to the left or the right.
This takes a little patience as you have to do it to every single Item. However, I find it easier. As an added bonus, I learned how to manually tweak large pictures by editing their attributes directly in the text. This is helpful when you have a high number of layers, patterns, and masking. HeroMachine can bog down, sometimes even lock up. And yes, definitely remember to save your creations as text!
October 14, 2012 at 8:04 am #12221
HammerknightParticipantGood advice all around. I always take my characters to Paint.net and group them there, I guess I’m to lazy to do it the other way.
April 7, 2013 at 8:28 am #22069
WMDBASSPLAYERParticipantKaylin, I just saw your group shot tutorial and I’m going to give it a try. I created 10 themed characters I would love to group and though it sounds like it requires a lot of patience and time, your method seems like the way to go. The 2 trios I made I did one character at a time and kept shifting back & forth between them. Acchhh, what a headache! One thing I’m not sure of; do you save after each character added? Also, it seems to not work if there is a background, (I edited this post after a little experimenting). Assuming the first character was the very bottom layer, I tried to remove the background items from the second so I could see the first character, but nothing happened.
May 6, 2013 at 2:59 pm #23889
Kaylin88100ParticipantThe way to do a background is to make it separately from the characters and then load it first, with the figures loading on top. It’s probably best if you finish each “layer” of character or background separately, and then don’t do too much tweaking once you’ve put them together. Also, there is a glitch that means if you add a new load on top of an existing character, the bottom layer of the new character is layer 1, and the old character gets pushed into negative numbers, which is mildly annoying as you can’t move anything down a layer below 1. All you can do is move things up, which thankfully seems to work fine.
August 7, 2013 at 4:39 pm #29420
ryanMember@Kaylin88100 said:
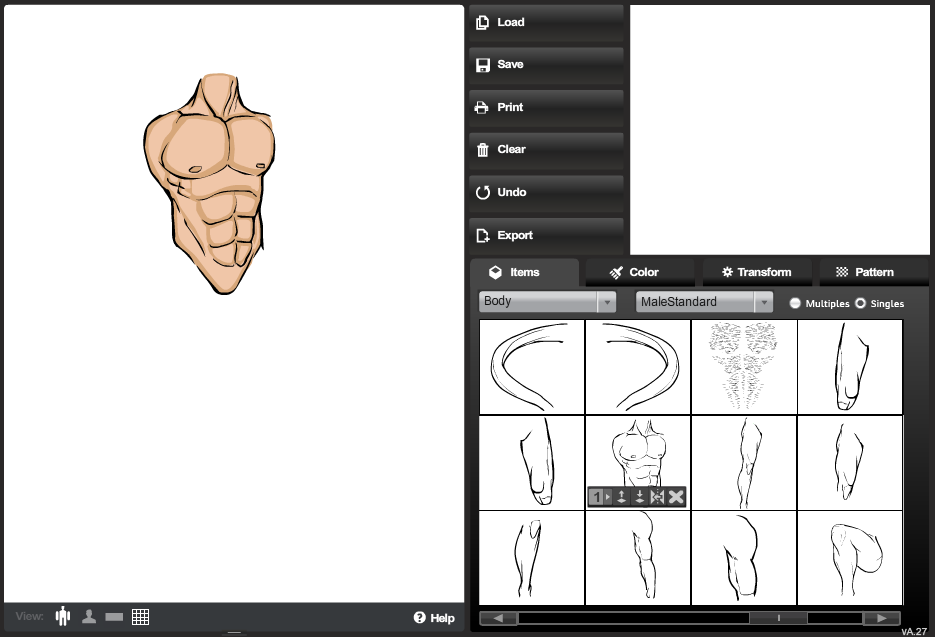
OK, new tutorial. As requested by djuby, a tutorial on how to dress the 3/4 male torso. This tutorial assumes you’re completely new to masking and have no idea how to do it, so if that doesn’t apply to you, please don’t be offended if you feel you’re being treated like an idiot.
To start with, this is the body we’re dressing, coloured the way I want it.
http://i1111.photobucket.com/albums/h464/Kaylin88100/HeroMachine%20Tutorials/masking1.png
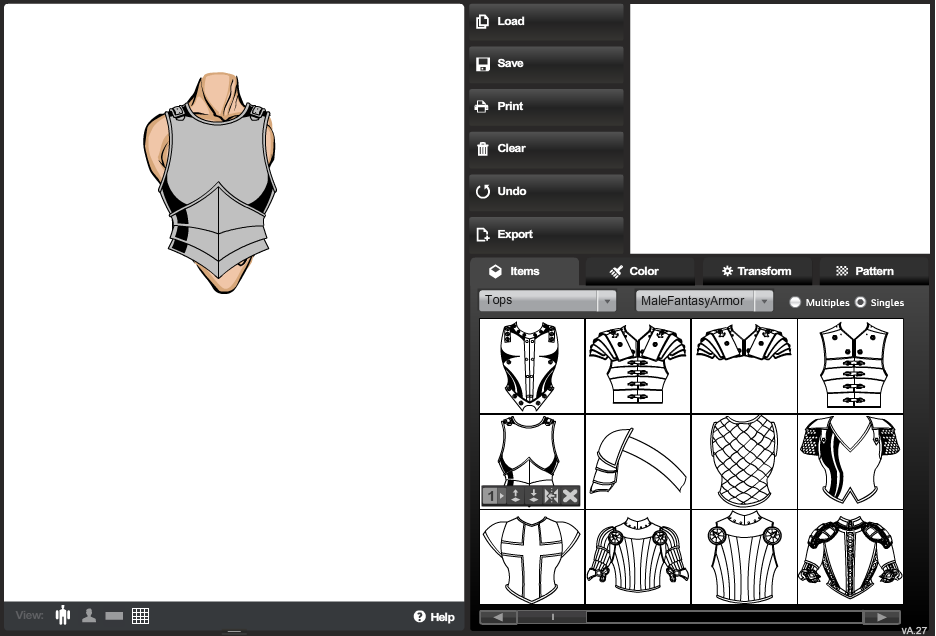
Now choose the top you want on it. I’ll use the same example as MDM.
http://i1111.photobucket.com/albums/h464/Kaylin88100/HeroMachine%20Tutorials/masking2.png
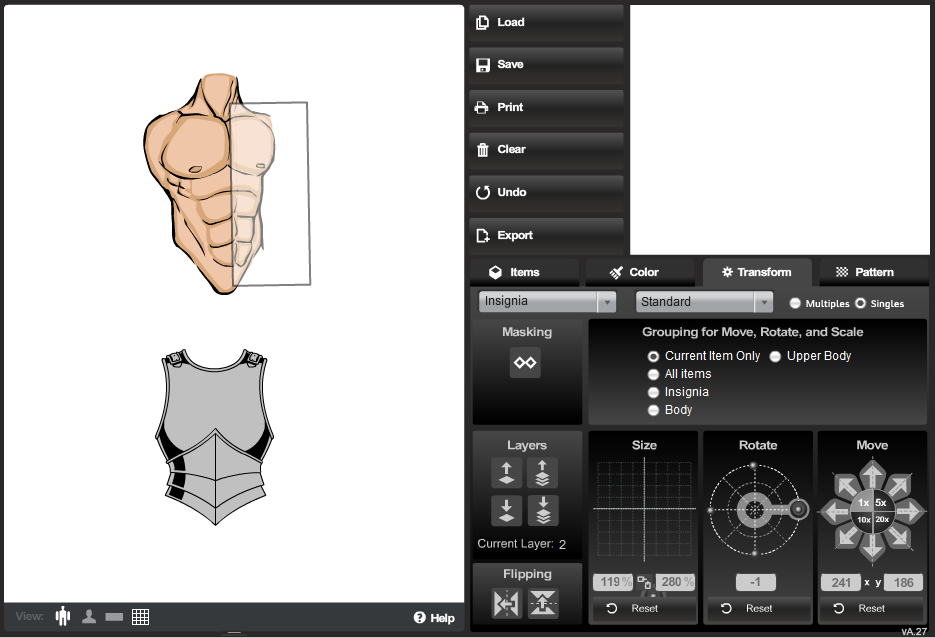
Colour the top and move it out of the way. Now get a square Insignia and resize it so it covers half of the torso. The line should be over the middle of the chest – this is usually slightly slanted, so you’ll need to rotate the insignia about 2 degrees.
http://i1111.photobucket.com/albums/h464/Kaylin88100/HeroMachine%20Tutorials/masking3.png
It’s easier if you make the insignia transparent except for the lines. Place another one on the other side and line them up. You might need to make this one bigger.
http://i1111.photobucket.com/albums/h464/Kaylin88100/HeroMachine%20Tutorials/masking4.png
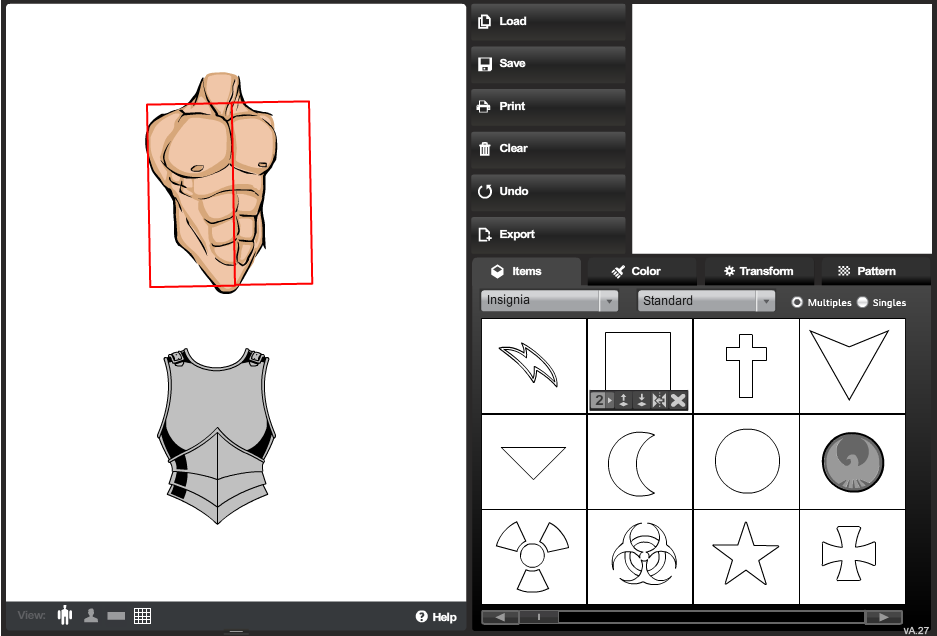
Move the top into position (line up the middle with the lines of the insignias) and resize it so one side (I’ve started with the left) fits. You might need to move the insignias a bit so they completely enclose the top.
http://i1111.photobucket.com/albums/h464/Kaylin88100/HeroMachine%20Tutorials/masking6.png
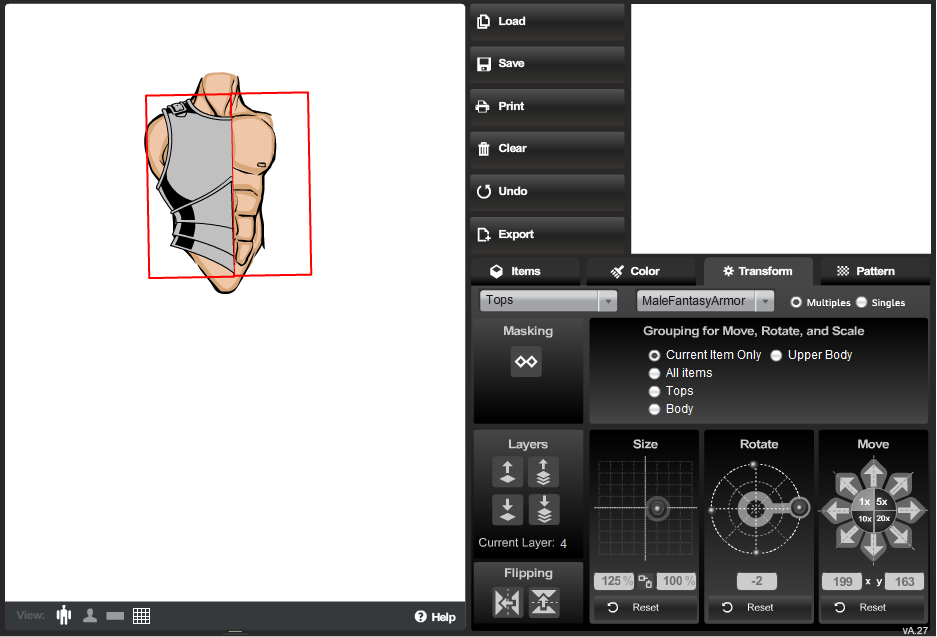
Make sure you have the top selected. Now click the Mask button on the Transform tab, and then click the insignia on the left (or whichever side the top is sized to fit). You should now see that half the top disappears.
http://i1111.photobucket.com/albums/h464/Kaylin88100/HeroMachine%20Tutorials/masking7.png
What has happened is that you have masked the top to the insignia. This means that only the parts of the top which are inside the insignia are visible. You can move it around if it’s not quite in the right position.
Now make a second top. You will notice that this one isn’t masked – yet. Resize it so it fits the other side of the body, and mask it to the other insignia. Make the final adjustments so the top looks right, and then you can make the insignias completely transparent and send them to the back out of the way.
http://i1111.photobucket.com/albums/h464/Kaylin88100/HeroMachine%20Tutorials/masking8.png
I’ve left them in here, but if I was using this for a real character, this is the stage where I would get them out of the way so I could work on the arms.There you go! Finished!
thx now i can practice on that
-
AuthorPosts


You must be logged in to reply to this topic.
