
Masking is the process of placing one item inside another, so that the masked item is only visible where it overlaps the masking item. Masking causes a lot of confusion, so let’s look at a few examples at what this subtle and powerful tool can do.
The basic process works like this:
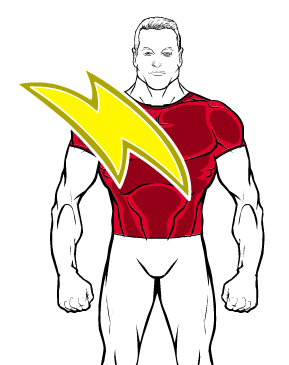
- Load the first item, the one you want to be 100% visible. For instance, you might add a nice button-down shirt.


- Load the second item, the one you want to be masked into the first one such that only the parts of it that overlap are visible. For instance, you might add a lightning bolt from Insignia-Standard. Position, scale, rotate, and otherwise place the second item where you want it to appear on the first one.

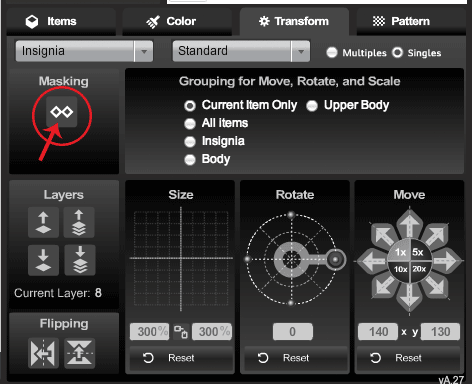
- Click on the second item (in our example, the lightning bolt insignia) to make it the current, active item.
- Under the Transform tab, click the Mask button. Your cursor turns into a little mask icon because super-heroes. I blame Robin — be glad it’s not scaled hot-pants.

- Click on the original item (in our example, the shirt). You’re telling the program “Hey, I want to place the active item into this other item that I’m clicking on.”


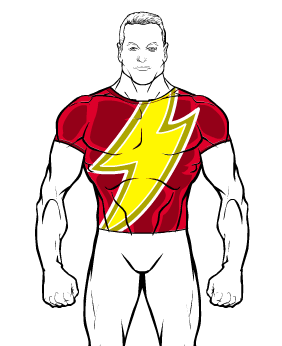
Voila! You have masked one item onto another one. Like this:
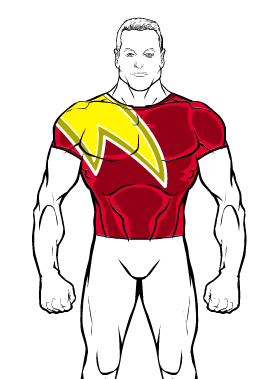
Note that once it’s masked, you can drag, rotate, or otherwise transform the masked item (the lightning bolt) around and it stays masked, only being visible where it overlaps the masking item (the shirt):
Using this same basic approach — load the base item, load the second item, click mask, click the base item — you can place items in your character’s hands, apply a flag from Backgrounds to a banner or shirt, make a belt fit a non-Standard body, and much, much more. It opens up a staggering array of possibilities to take your portrait from a paper doll to a true illustration.

When I mask I see the lines of the first item ontop of the second one and when I use transperancy on them they remain as holes.
how do I solve that? that’s my main turn off from masking
Hi Haxxx, I’m not sure I understand — can you post an image of what you are seeing?
Odds are it’s not fixable (I’m sort of at the mercy of how Flash does things) but I’d like to check it out just in case.
Jeff, if you look at the last image on the post, you can see the inner lines on the shirt (muscle definition, that sort of thing) on the lightning bolt where it’s masked on. I think that’s what Haxxx means. It’s something that’s always happened and, in most cases, I find it actually helps give more realism to the masking, especially when masking to clothes, so you get the folds and stuff on the masked item.
Also you might want to have a look at the Quote button for the comments, because it keeps removing the spaces between words for some reason (see the quote at the top of this comment to see what I mean).
I think he means when you mask an item to another item the line art of the masked too item shows through, and if you use transparency the line art doesn’t go away, it just becomes white lines. The way I usually fix this is to put something under the masked item of the color you want and it usually fills in the transparent white lines. Other times I will just layer an insignia on top re-sized to cover the white lines but small enough not to go outside the masked items new boundries.
Sorry about the quote thing, I couldn’t figure out what was going on with it and the plugin hasn’t been updated since 2009 so for now I just disabled it. In the meantime, I think you can use blockquote tags per the little instructions below the comment box. It was easier with the button, but c’est la vie. I’m going to try it here:
For masking, assuming JR is right, that’s a feature not a bug. Basically the mask area is a duplicate of color1, which usually has the line art cut out of it. Not in every case, but particularly for bodies and shirts I usually leave the muscle and detail lines in. I agree with JR that it looks more realistic in those.
Now, honestly, I haven’t been very consistent about how I make the mask/color1 areas. Sometimes they have lines and sometimes they don’t. But that’s the reason it happens.
Well for HeroMachine FOUR maybe you can make a mask 1 and mask 2 button where one can be with the lineart showing through and one without the line art.
Haxxx says:
January 8, 2014 at 2:45 pm
When I mask I see the lines of the first item on top of the second one and when I use transperancy on them they remain as holes.
how do I solve that? that’s my main turn off from masking
I have 3 masking “faults” and 3 masking solutions!
In the first problem I did not like a single line Area A I covered it with a smaller insignia circle, and then turned the circle to the desired color of item one (the colors don’t match cause of shading)
Problem to the second body (Area B) I masked the blob to Was misaligned from the first one- you could realign the bodies, or
I used the circle trick to get a “boob” sized circle color it solidly the color you want and then drop the circle one layer.
//www.heromachine.com/wp-content/legacy/forum-image-uploads/keric/2014/01/MP1-and-2.PNG[/img]
I think though that you are trying to mask complex pattern item one to complex pattern item two- that never works
solution: mask complex pattern item to simple item!
It may give you an extra layer, but that is ok!
[img]https://www.heromachine.com/wp-content/legacy/forum-image-uploads/keric/2014/01/masking-problem-3.PNG[/img][/quote]
//www.heromachine.com/wp-content/legacy/forum-image-uploads/keric/2014/01/MP1-and-2.PNG[/img][img]https://www.heromachine.com/wp-content/legacy/forum-image-uploads/keric/2014/01/masking-problem-3.PNG[/img]
Haxxx here are the visuals
https://www.heromachine.com/wp-content/legacy/forum-image-uploads/keric/2014/01/MP1-and-2.PNG
https://www.heromachine.com/wp-content/legacy/forum-image-uploads/keric/2014/01/masking-problem-3.PNG
Pretty good tutorial. Speaking as a technical writer, they can be hard. As for masking complicated shapes onto complicated shapes, that’s how I get some of my most unique results.
One of the techniques I find myself using is what I think of as “double masking”, where I combine two objects like an insignia and a garment by making two copies of each and then masking A1 to B1 and B2 to A2 in order to get the lines from one and the colors from the other. Perhaps a example will help.
Say that I wanted the shading of the shirt in Jeff’s example to continue into the insignia, as if the insignia is just color in the fabric of the shirt…
Double Masking example
What you see here is that I have one red shirt that is the shirt and one yellow shirt that is used to be the colored are of the insignia. I then mask the yellow shirt to the insignia (the reverse of what Jeff did) to get a piece of yellow shirt shaped like the insignia.
Then I mask a second insignia to the red shirt, much as Jeff did, but I make its color 1 and color 2 transparent so that all I get is the lines.
The insignia that is used as a mask is still visible so I hide it behind a background, by making in all white or by making it transparent. In this case I used a large rectangular whit background to hide it behind.
I hope my description and picture make it clear.
I do lots and lots of masking, often for relatively small effects.
Hey how do I make clothing and hair follow what is turned to the side? Like if I have a head turned right, then I don’t want the hair still turned straight. I want it turned along with the head.
How do you mask a belt to one side of your body?
How do you mask a belt to one side of your body and another belt to the other?
Mason, that’s tricky. Basically you load one Body that you want, load the first belt, move it over however far for the desired effect, and Mask it to that Body.
You then load a SECOND identical Body, placed directly over the first. Load the second belt, position it, and Mask it to that second Body. Then switch to the second Body, and set all three colors to an Alpha of 0.
You end up with two identical Bodies stacked on top of each other, each with one Belt masked to it. The topmost Body, however, has been rendered invisible.