
Home › Forums › The HeroMachine Art Gallery › Tips, Tricks, How-Tos, and Guides › Kaylin’s Tutorials
- This topic has 31 replies, 12 voices, and was last updated 10 years, 6 months ago by
 Kaylin88100.
-
AuthorPosts
-
July 5, 2012 at 2:54 pm #341

Kaylin88100ParticipantI’ve noticed there are a lot of questions that seem to crop up a lot, so I thought I’d start posting some simple tutorials to help people out. The first one I’m going to tackle is text saving, and I should have the tutorial up by tomorrow.
July 13, 2012 at 12:16 pm #7483
Kaylin88100ParticipantOK, that was a week ago and I still haven’t figured out a good way of sharing this tutorial with you guys. It’s too big to share on this site, and I don’t like MediaFire. Oh well…here you go. Any suggestions on better ways to do this?
http://www.mediafire.com/?hdtvnu46633uoc1July 13, 2012 at 1:38 pm #7487
AFDStudiosKeymasterI don’t quite understand what it is that’s being done. Is it a video file or something?
July 13, 2012 at 2:37 pm #7489
Kaylin88100ParticipantFlash file, created using Wink tutorial software (Google it). Unfortunately, it’s too big for the media-upload limits you’ve set on here, so I have to find another way of sharing it.
July 20, 2012 at 6:11 am #7812
Kaylin88100ParticipantOkay…going back to just screenshots, here’s a tutorial for a way to dress the female 3/4 turned torso.
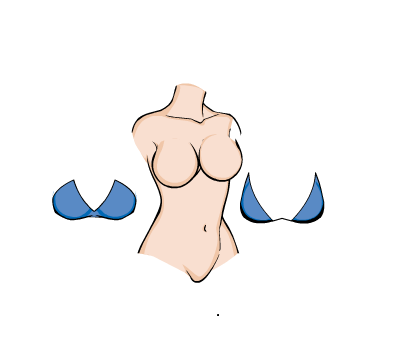
Start with the torso itself, and if you want you can add breasts. There are some already on the torso, but I personally don’t like the way they look, so I cover them up like this:
http://i1111.photobucket.com/albums/h464/Kaylin88100/3_4tutorial1.png
Obviously for your character the rest of the body will be there as well. Colour the body items with whatever skin colours you want.
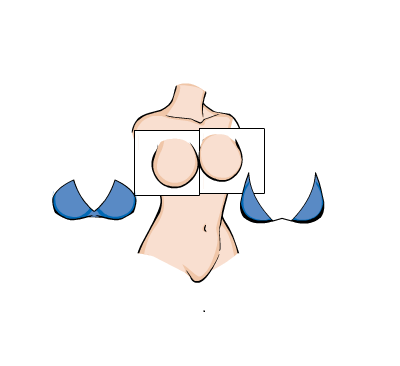
Next, you need these two items from Tops – Female Bustiers, coloured the same as each other.
http://i1111.photobucket.com/albums/h464/Kaylin88100/3_4tutorial2.png
Add two square Insignias next to each other, lined up so they meet right at the centre of the breasts:
http://i1111.photobucket.com/albums/h464/Kaylin88100/3_4tutorial3.png
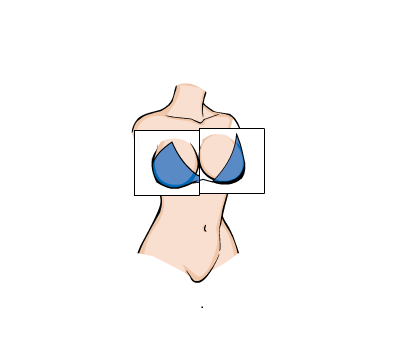
Position the tops as shown, and mask them to the insignias:
http://i1111.photobucket.com/albums/h464/Kaylin88100/3_4tutorial4.png
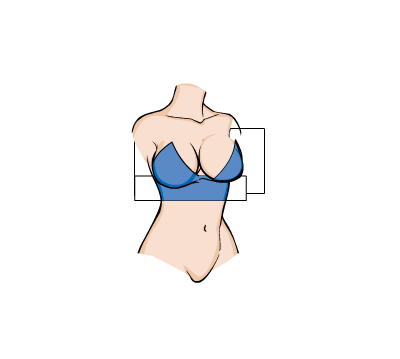
Add another square insignia, resize it, colour it, and mask it to the torso beneath the tops, to cover up the strange way they join.
http://i1111.photobucket.com/albums/h464/Kaylin88100/3_4tutorial5.png
If you want it to look really good, you can mask a second torso to that insignia, and colour it to match the tops.
http://i1111.photobucket.com/albums/h464/Kaylin88100/3_4tutorial6.png
You might need to tweak the positions of the items a bit, but that’s how you do it. When you’re done, send the two squares to the back and make them transparent or something. Done!
July 20, 2012 at 3:41 pm #7829
HarlekinMemberNot bad, very usefull tutorial.
July 21, 2012 at 4:50 am #7867
Kaylin88100ParticipantThanks, Harlequin. I try.
 July 21, 2012 at 7:44 am #7872
KaldathKeymasterKaylin I must say that you continue to impress me with your helpfulness to the community and I for one any more then happy to have you here on these forums !
July 21, 2012 at 8:43 am #7875
Kaylin88100ParticipantThanks very much Kaldath.
August 9, 2012 at 4:17 am #8794
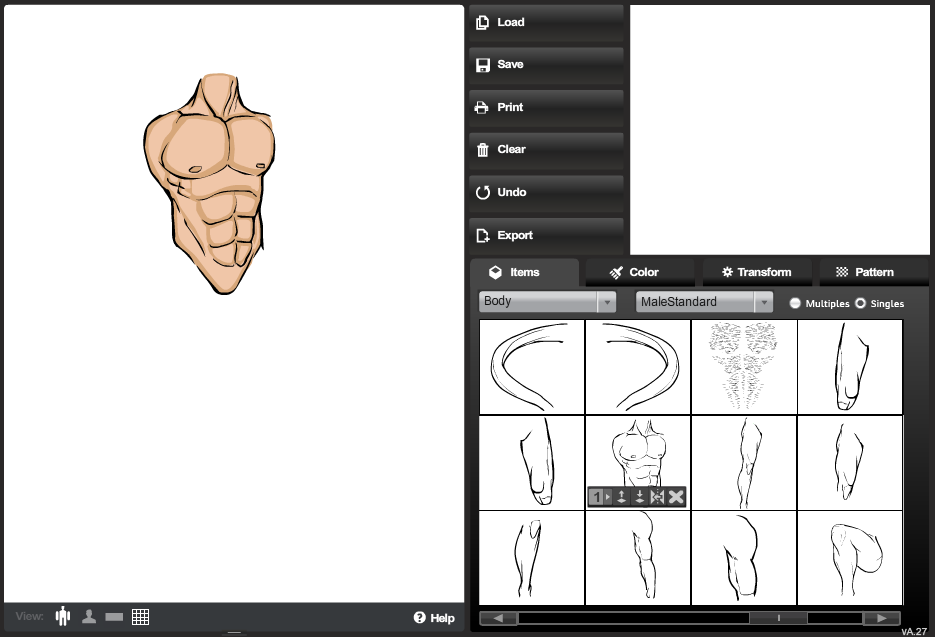
Kaylin88100ParticipantOK, new tutorial. As requested by djuby, a tutorial on how to dress the 3/4 male torso. This tutorial assumes you’re completely new to masking and have no idea how to do it, so if that doesn’t apply to you, please don’t be offended if you feel you’re being treated like an idiot.
To start with, this is the body we’re dressing, coloured the way I want it.
http://i1111.photobucket.com/albums/h464/Kaylin88100/HeroMachine%20Tutorials/masking1.png
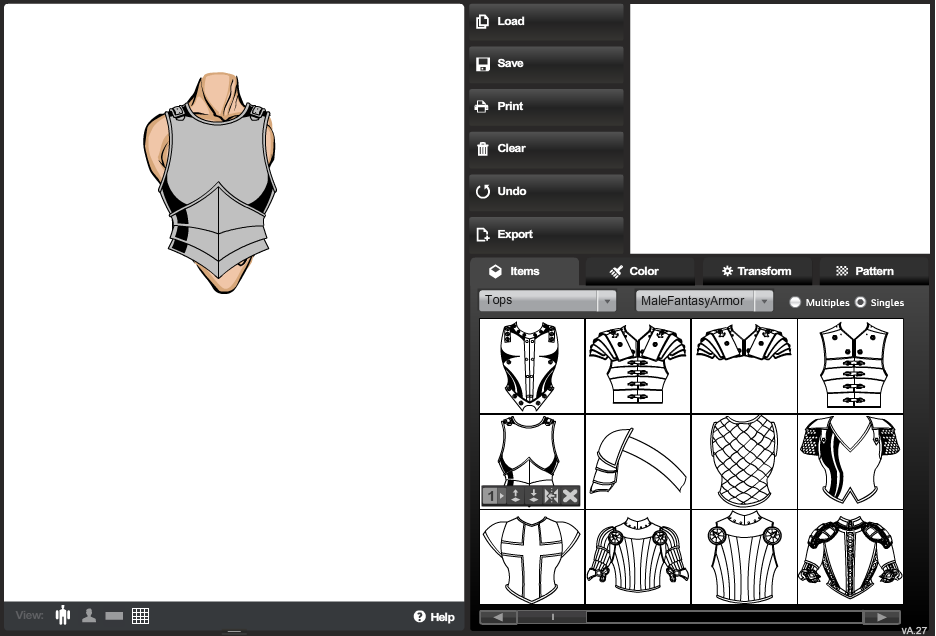
Now choose the top you want on it. I’ll use the same example as MDM.
http://i1111.photobucket.com/albums/h464/Kaylin88100/HeroMachine%20Tutorials/masking2.png
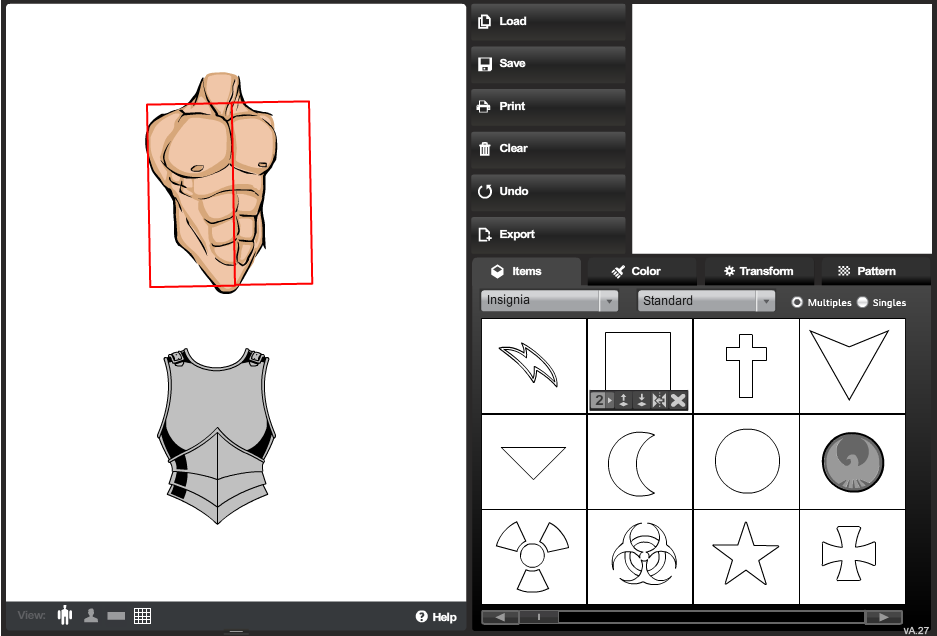
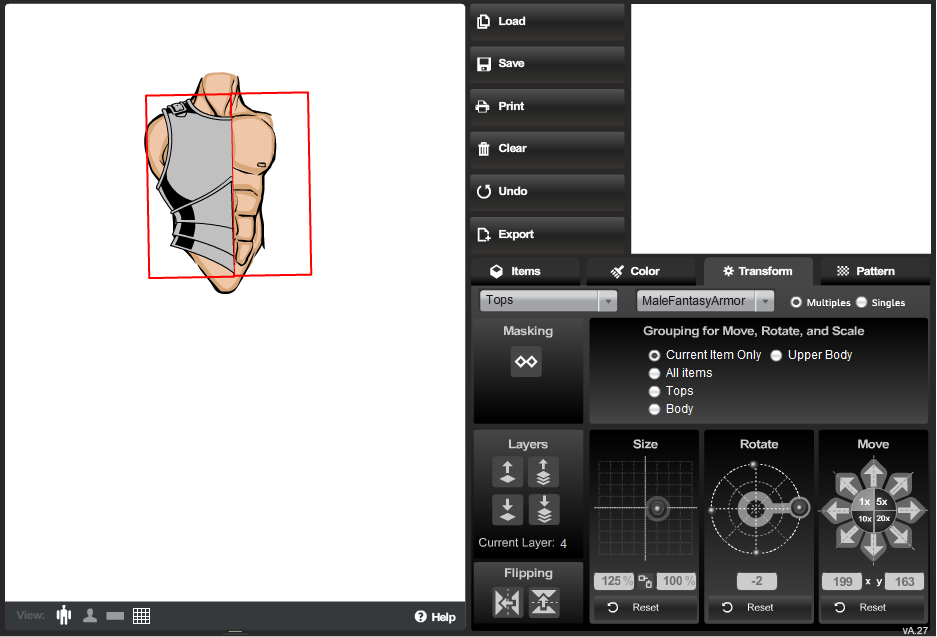
Colour the top and move it out of the way. Now get a square Insignia and resize it so it covers half of the torso. The line should be over the middle of the chest – this is usually slightly slanted, so you’ll need to rotate the insignia about 2 degrees.
http://i1111.photobucket.com/albums/h464/Kaylin88100/HeroMachine%20Tutorials/masking3.png
It’s easier if you make the insignia transparent except for the lines. Place another one on the other side and line them up. You might need to make this one bigger.
http://i1111.photobucket.com/albums/h464/Kaylin88100/HeroMachine%20Tutorials/masking4.png
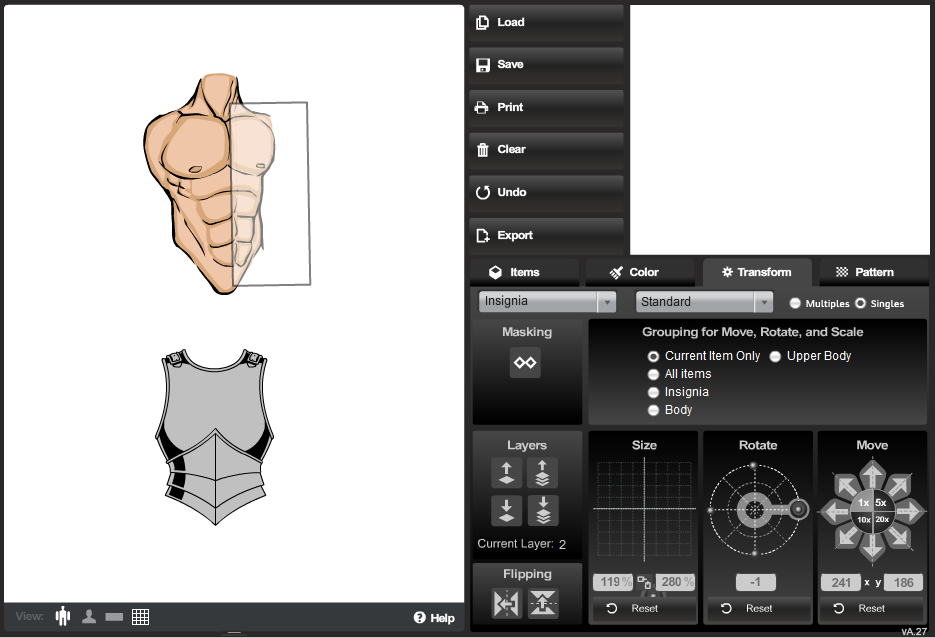
Move the top into position (line up the middle with the lines of the insignias) and resize it so one side (I’ve started with the left) fits. You might need to move the insignias a bit so they completely enclose the top.
http://i1111.photobucket.com/albums/h464/Kaylin88100/HeroMachine%20Tutorials/masking6.png
Make sure you have the top selected. Now click the Mask button on the Transform tab, and then click the insignia on the left (or whichever side the top is sized to fit). You should now see that half the top disappears.
http://i1111.photobucket.com/albums/h464/Kaylin88100/HeroMachine%20Tutorials/masking7.png
What has happened is that you have masked the top to the insignia. This means that only the parts of the top which are inside the insignia are visible. You can move it around if it’s not quite in the right position.
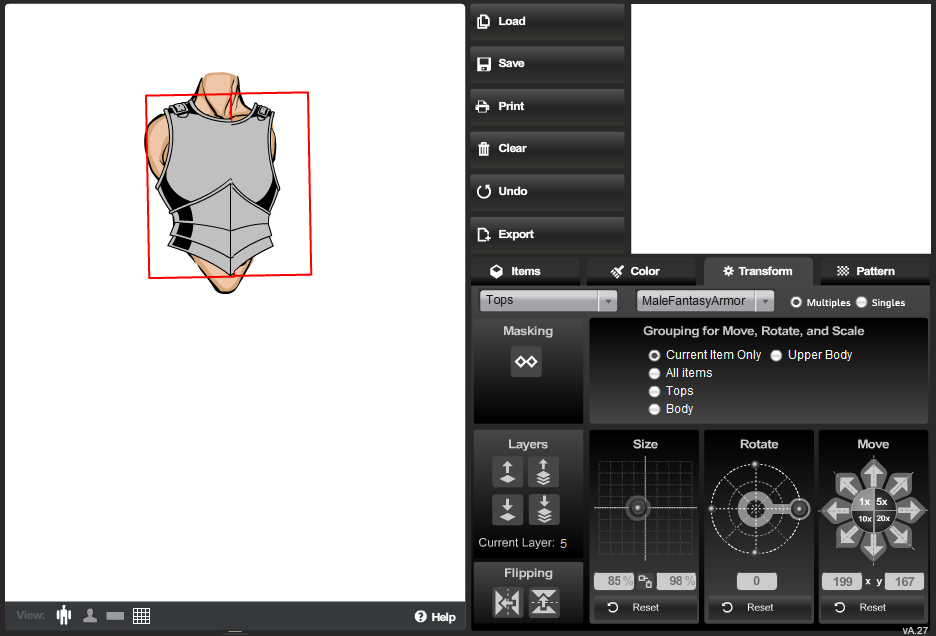
Now make a second top. You will notice that this one isn’t masked – yet. Resize it so it fits the other side of the body, and mask it to the other insignia. Make the final adjustments so the top looks right, and then you can make the insignias completely transparent and send them to the back out of the way.
http://i1111.photobucket.com/albums/h464/Kaylin88100/HeroMachine%20Tutorials/masking8.png
I’ve left them in here, but if I was using this for a real character, this is the stage where I would get them out of the way so I could work on the arms.There you go! Finished!
August 9, 2012 at 7:58 am #8818
djubyParticipantThank you, thank you, thank you! Could not get my square inignia large enough to cover, but reduced the size of a background square instead. The pictures were great but your written instructions were AMAZING!
August 9, 2012 at 8:26 am #8822
HarlekinMemberHmmm very hmmm.
Very similar my tutorial what i made in the old forum. Hmmm. Hmmm.
 August 9, 2012 at 8:30 am #8823
Kaylin88100Participant@djuby said:
Thank you, thank you, thank you! Could not get my square inignia large enough to cover, but reduced the size of a background square instead. The pictures were great but your written instructions were AMAZING!
Thanks for the compliment.
There are two ways of changing the size of an item: dragging the slider (which only goes up to 200) and the text entry boxes, which go up to 999. If you can’t get an item big enough using the slider, try typing values in the 200s into the text boxes.August 9, 2012 at 8:37 am #8825
HudsonParticipantCool…I never noticed the text boxes could exceed 200! Thanks!
August 9, 2012 at 5:54 pm #8866
HammerknightParticipant@Harlequin said:
Hmmm very hmmm.
Very similar my tutorial what i made in the old forum. Hmmm. Hmmm.
They are close, but we all learn from each other. I haven’t done a tutorial for a while so I’m glad to see other people are making the effort.
-
AuthorPosts
You must be logged in to reply to this topic.
